Hello there! I’m Bonny Elangbam, and if you’ve been in the WordPress ecosystem for any length of time, you know that the leap from a “good” website to a “breathtaking” one usually happens the moment you unlock the premium tray.
In my years of designing high-converting landing pages and intricate portfolios, I’ve found that while the free version of Elementor is a fantastic starting point, the real magic, the stuff that makes clients go “Wow”, is hidden within the suite of Elementor Pro widgets.
Today, I’m taking you on a deep dive into how to use these tools to master advanced design in 2026.
A Quick Story from the Trenches: Early in my career, I spent three days trying to “hack” a free theme to create a custom header that stayed sticky and changed color on scroll.
I used three different plugins and about 150 lines of messy CSS. When the theme was updated, the whole site crashed. That was my “lightbulb” moment. I realized that struggling with free tools was actually costing me more in billable hours than the price of a Pro license.
I switched, rebuilt the header in 15 minutes using the Elementor Pro widgets, and never looked back. Don’t trade your time for a “free” workaround.
Why Elementor Pro Widgets Change the Game for Designers
When I first started using WordPress, I relied heavily on third-party plugins to fill the gaps. I had one plugin for forms, another for sliders, and a third for my portfolio.
It was a bloated mess. When I finally switched to the Pro version, I realized that the core Elementor Pro widgets act as a Swiss Army knife, replacing dozens of disparate tools with one cohesive, high-performance system.
1. The Power of Theme Building
The most significant advantage of having access to these widgets is the Theme Builder. It allows me to design my own headers, footers, and single post templates.
Instead of being locked into a theme’s rigid structure, I use the Posts widget and Archive Posts widget to create dynamic layouts that update automatically whenever I add new content.
2. Eliminating Plugin Bloat
Every time you add a new plugin, you risk slowing down your site. By using the built-in Form widget or the Lottie widget, you keep your code clean.
As a designer, my priority is always aesthetics, but as a developer, I know that speed is just as important for SEO and user experience.
The Comparison Table (Scannability & Value)
| Feature | Free Elementor | Elementor Pro Widgets |
| Forms | Basic Contact | Multi-step, Honeypot, Integrations |
| Theme Building | None | Custom Headers, Footers, 404 Pages |
| Popups | No | Exit-intent, Scrolling, Time-delays |
| WooCommerce | Basic List | Custom Cart, Checkout, & Product Pages |
| Dynamic Content | Static Only | Pulls data from ACF, Toolset, & JetEngine |

Mastering the Advanced Elementor Pro Widgets
To truly excel at advanced design, you need to look beyond the basic “Heading” and “Image” blocks. Let’s look at the heavy hitters that I use in almost every professional project.
The Animated Headline and Media Carousel
One of my favorite Elementor Pro widgets for hero sections is the Animated Headline. It adds a layer of motion that guides the user’s eye exactly where you want it. Whether it’s a rotating text effect or a highlighted underline, it brings life to static copy.
Pairing this with the Media Carousel allows for high-end visual storytelling. Unlike the basic slider, the Media Carousel offers “Coverflow” and “Slideshow” skins that feel premium.
I often use this for photography portfolios or product showcases where the transition between images needs to feel like a high-end fashion magazine.
Converting Leads with the Form Widget
Design isn’t just about looking pretty; it’s about functionality. The Form widget is arguably the most powerful tool for business owners.
I can create multi-step forms that don’t overwhelm the user, integrate them directly with Mailchimp or HubSpot, and style every single border and button to match the brand’s identity perfectly.
Pro Techniques with Custom Elementor Pro Widgets
If you want to go even further, you can start looking into Global Widgets. This is a feature I use for Call-to-Action (CTA) sections. I design a single CTA using various Elementor Pro widgets, save it as a Global Widget, and drop it across twenty different pages.
If I ever need to change the button color or the copy, I change it in one place, and it updates everywhere instantly. That is the definition of an efficient workflow.
Is your current setup slowing you down? If you are feeling overwhelmed by all these options, I can help. I offer a 30-minute Design Strategy Audit where we look at your current widget stack and identify exactly where you can trim the fat and boost conversions. Let’s make your site work as hard as you do.

The Deep Dive: Dynamic Content and Marketing Power
In 2026, static websites are dinosaurs. If you aren’t using dynamic content, you’re missing out on the primary reason people invest in the Pro license. I use the Dynamic Tags feature integrated within almost all Elementor Pro widgets.
This allows me to pull data from Advanced Custom Fields (ACF) or JetEngine and display it beautifully.
For instance, imagine you are building a real estate site. You don’t want to manually design a page for every house.
Instead, you design one “Single Property” template using the Price List widget and Google Maps widget, and tell Elementor to pull the price and location data directly from the database. This turns your website into a living, breathing application.
The Marketing Suite: Popups and CTAs
Another massive advantage is the Popup Builder. Forget those annoying, generic popups. With the Pro tools, I can design a pop-up that triggers exactly when a user finishes reading a blog post or shows “Exit Intent.”
I often use the Countdown widget inside these pop-ups to create a sense of urgency for limited-time offers.
Because these are all native Elementor Pro widgets, they share the same styling controls as the rest of your site, ensuring that your marketing messages feel like an integrated part of the brand experience rather than an intrusive afterthought.
Contextual Pro-License Mention (Non-Pushy)
Most of the features I’m discussing, like Dynamic Tags, require an active Pro license. If you haven’t made the jump yet, it’s worth considering it as a foundational investment in your business infrastructure rather than just another “plugin expense.”
Advanced Aesthetic Controls: Motion and Interaction
Let’s talk about the “Feel” of a website. When a user scrolls down a page, they should feel like they are interacting with a physical space. This is where Motion Effects and Mouse Effects come into play.
By applying these to your Elementor Pro widgets, you can create parallax backgrounds where images move at a different speed than the text. You can also use the Tilt effect on images, making them react as the user moves their cursor.
It’s subtle, but it’s these micro-interactions that separate professional designers from hobbyists.
Adding High-Fidelity Motion with Lottie
Lotties are vector-based animations that remain razor-sharp while keeping file sizes microscopic.
- Where to find them: I recommend LottieFiles; it’s the industry standard for free and premium animations.
- 3-Step Setup:
- Download your chosen animation as a JSON file (or copy the Asset Link).
- Drag the Lottie widget into your section.
- Upload the JSON file and set the trigger to “On Scroll” or “Hover” for maximum engagement.
eCommerce Excellence with WooCommerce Widgets
If you’re running a shop, the standard WooCommerce layout is often… well, boring. The Elementor Pro widgets specifically designed for WooCommerce allow you to take full control over the shopping experience.
- Product Price & Add to Cart: Position these anywhere, not just where the theme tells you.
- Product Stock & Ratings: Build social proof into your custom layouts.
- Menu Cart: Create a sliding side-cart that looks modern and keeps the user on the page.
I recently finished a project for a high-end jewelry brand where we used the Portfolio widget to create a custom gallery that linked directly to the product pages. The result was a seamless journey from “browsing” to “buying” that increased their conversion rate by 15% in the first month.
The Role of Global Styles and Design Systems
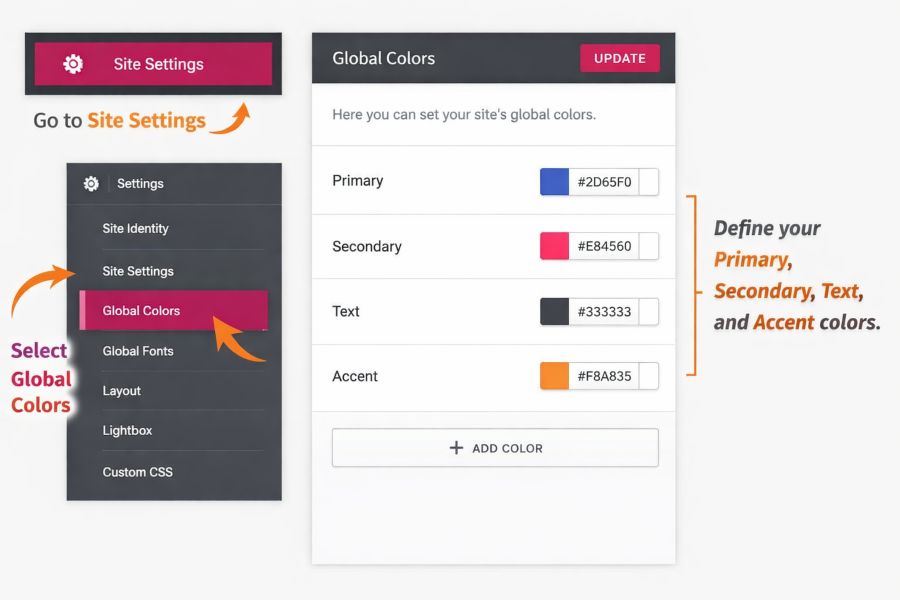
One thing I always tell my students is that speed in design comes from organization. The Elementor Pro widgets allow you to implement a full design system. By setting up Global Colors and Global Fonts, every widget you drag onto the canvas is already 90% styled.
This is particularly useful when working with the Nav Menu widget. Setting up a complex, responsive navigation bar can be a headache.
But with Pro, I can style the mobile toggle, the dropdown animations, and the hover states in one central location. It ensures that as the site grows to 50 or 100 pages, the navigation remains consistent and bug-free.
Elevating Your Design Strategy
We’ve covered a lot of ground, from the structural benefits of theme building to the interactive “wow” factor of motion effects.
Using Elementor Pro widgets isn’t just about having more icons to drag onto a page; it’s about having the creative freedom to build exactly what you envision without being held back by technical limitations.
In my experience, the investment pays for itself in the time saved and the quality of the final product. Your website is your digital storefront, don’t settle for “basic” when “extraordinary” is just a few widgets away.
I have seen countless businesses transform their online presence simply by utilizing these advanced tools to their full potential.
Are you ready to transform your WordPress site? Contact me today to build a faster, smarter, and conversion-focused website, and turn your site into a true digital asset.
About the Author: Bonny Elangbam
I am Bonny Elangbam, a digital strategist and WordPress specialist with a passion for clean, functional design. I believe that technology should empower creativity, not stifle it.
Through my work and my writing, I aim to help designers and entrepreneurs bridge the gap between technical complexity and beautiful user experiences.
When I am not tweaking CSS or exploring the latest Elementor Pro widgets, you can find me researching the future of AI in web development and mentoring aspiring designers to find their unique voice in the digital space.
Can I use Elementor Pro widgets without the free version?
No. Elementor Pro requires the free Elementor plugin to be installed and active, as it builds upon its core functionality.
Will adding many Pro widgets slow down my website?
While the widgets themselves are highly optimized, adding too many heavy elements like video carousels and complex Lottie animations can impact load times. I always recommend using a good caching plugin and optimizing your images to keep things snappy.
Which Elementor Pro widgets are essential for an eCommerce store?
The WooCommerce widgets in Elementor Pro are essential. They allow you to build custom Product pages, Cart pages, and even “Add to Cart” buttons that fit your specific design style rather than relying on a generic theme layout.
Can I create a pop-up with Elementor Pro?
Yes. The Popup Builder is one of the most powerful features. You can trigger popups based on exit intent, scroll depth, or even specific actions, giving you complete control over your lead generation strategy.
Is the price for Elementor Pro worth it for a single site?
As someone who builds for a living, I say yes. The time you save by not having to troubleshoot five different third-party plugins is worth the subscription fee alone. It provides a level of professional polish that is hard to achieve otherwise.