Hi, I’m Bonny Elangbam. As a web performance specialist and digital strategist, I’ve spent the last decade helping brands transform sluggish websites into lightning-fast, high-converting assets. My philosophy is simple: a beautiful website is useless if no one waits for it to load.
I specialize in WordPress architecture and search engine visibility, focusing on the intersection of technical SEO and user experience. When I’m not auditing Core Web Vitals, you’ll find me exploring the latest in AI-driven design or sharing tips with the global creator community.
If you’ve waited for a massive hero image to load, you know why Image Optimization matters. Too often, heavy images bury great content in Google rankings.
In this guide, I share my proven tactics to shrink file sizes, boost speed, and satisfy both users and search engines for higher SEO performance.
Why Image Optimization is the Foundation of Modern SEO
Before we get into the “how,” let’s talk about the “why.” Google’s 2026 algorithm is more focused on user experience than ever before. If your images aren’t optimized, your Core Web Vitals, specifically Largest Contentful Paint (LCP), will suffer.
Images typically account for over 60% of a total webpage’s weight. By mastering Image Optimization, you aren’t just “fixing” a site; you are fundamentally changing how search engines perceive your authority. A fast site is a trustworthy site.
The 2026 Pro Image Workflow
To get that 100/100 score, every image on your site should follow this path:
- Capture/Design: High-res original.
- Resize: Scale pixels to match your container (e.g., 1200px).
- Optimize: Convert to AVIF and apply lossy compression.
- Upload: Add keyword-rich filenames and Alt Text.
- Serve: Deliver via Global CDN with native lazy loading enabled.
1. Choose the Right File Format (The WebP Revolution)
The first step in any Image Optimization workflow is choosing the right format. Gone are the days when JPEG and PNG were your only options.
Understanding Format Specificity
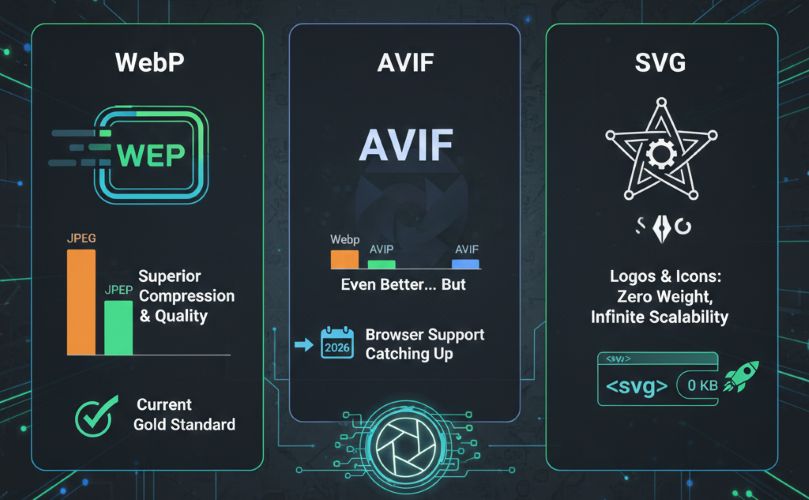
- WebP: This is the current gold standard. It provides superior compression and quality compared to traditional formats.
- AVIF: Even better than WebP in many cases, though browser support is still catching up (but it’s almost there in 2026!).
- SVG: Perfect for logos and icons. It is code-based, meaning it has zero weight and infinite scalability.
Why WebP Wins for Image Optimization
WebP allows you to maintain high-quality visuals at a fraction of the file size. When I switch a client from JPEGs to WebPs, I typically see a 30% to 50% reduction in total page weight immediately.
2. Implement Proper Image Scaling
One of the most common errors I see in my audits is “over-scaling.” This happens when you upload a 4000px wide image, but your website’s content container is only 800px wide.
Tactic: Serve Scaled Images
The browser still has to download the full 4000px file and then use its own processing power to shrink it down to fit the screen. This is a massive waste of resources. For effective Image Optimization, resize your images on your desktop or via an automated tool before they ever reach your server.
Mobile-First Scaling Considerations
Remember that mobile users don’t need desktop-sized images. Using srcset in your code allows the browser to choose the best-sized image based on the user’s screen resolution.
The Data: Why “Resizing” is Not “Scaling”
| Original Image Size | File Format | File Weight | Load Impact |
| 4000px (Unscaled) | JPEG | 4.2 MB | Critical Delay (3.5s) |
| 800px (Scaled) | JPEG | 210 KB | Moderate (0.8s) |
| 800px (Scaled) | AVIF | 38 KB | Instant (0.1s) |
3. High-Performance Image Compression for SEO & Speed
Compression is the heart of Image Optimization. There are two types: Lossy and Lossless.
- Lossy: Removes some data to shrink the file. To the human eye, the difference is often invisible, but the file size drop is huge.
- Lossless: Shrinks the file without removing any data. Great for photography portfolios, but less effective for massive speed gains.
Tools for Compression Tactic
I use ShortPixel or TinyPNG. Keep blog images under 100KB and icons under 30KB for optimal performance.
4. Leveraging SEO-Friendly Filenames
Google’s bots cannot “see” an image like you and I can; they read the metadata. This is where Image Optimization turns into pure SEO.
The Keyword Tactic
Never name an image IMG_5678.jpg. Instead, use descriptive, keyword-rich filenames like custom-header-elementor-tutorial.jpg. This tells Google exactly what the image represents, helping you rank in Google Image Search, a massive source of untapped traffic.
Using Hyphens for Readability
Always use hyphens (-) to separate words, not underscores (_). Google treats hyphens as spaces, while underscores are seen as a single string of characters.
Bonny’s SEO Pro-Tip: Search engines read image-optimization-tips as three distinct words. If you use image_optimization_tips, Google sees it as one long, unintelligible word. Always use hyphens to help the bots categorize your content correctly!
5. The Power of Alt Text and Title Tags
If you want to win at Image Optimization, you must take Accessibility seriously. Alt text (Alternative Text) is used by screen readers for visually impaired users, but it is also a primary ranking factor.
Tactic: Contextual Keyword Placement
Don’t just stuff keywords into the alt text. Describe the image naturally.
- Bad: “Elementor speed optimization image.”
- Good: “A screenshot of the Elementor settings panel highlighting speed optimization.”
6. Implementing Lazy Loading
Why should a visitor’s browser download the image at the very bottom of your page before they’ve even scrolled past the header?
Tactic: Below-the-Fold Optimization
Lazy loading tells the browser to wait until the image is about to enter the viewport before downloading it. This is a staple of Image Optimization.
Native Browser Lazy Loading
In 2026, most browsers support native lazy loading with a simple loading=”lazy” attribute. This reduces the initial “Time to Interactive” (TTI) and keeps your site snappy.
Bonny’s Performance Warning: While lazy loading is a miracle for speed, there is one major exception: The Hero Image. If you lazy-load the first image a user sees (your “Above the Fold” content), the browser will wait to start the download until the rest of the page is parsed.
This will significantly damage your Largest Contentful Paint (LCP) score. Always ensure your Hero image is set to “eager” or simply has lazy-loading disabled.
7. Utilize Image CDNs (Content Delivery Networks)
If your server is in New York and your visitor is in London, that image has a long way to travel.
Tactic: Global Image Delivery
An Image CDN like Cloudinary or Bunny.net stores copies of your images on servers all over the world. When a user visits your site, the image is served from the server closest to them.
Real-Time Image Optimization
Modern CDNs can even detect the user’s device and format the image on the fly. If they are on a Chrome browser that supports WebP, the CDN serves WebP. If they are on an old device, it serves JPEG.
Automation: Next-Gen CMS Plugins
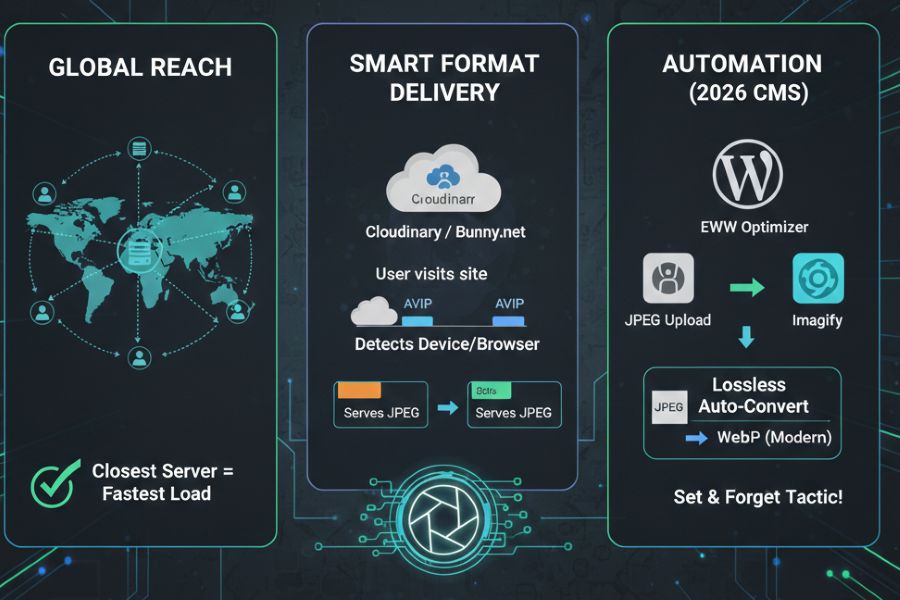
In 2026, you shouldn’t be converting images one by one. If you are on WordPress, I recommend EWWW Image Optimizer or Imagify.
- The Benefit: These plugins use “Lossless Auto-Convert.” You upload a JPEG, and the plugin automatically serves an AVIF version to modern browsers and a WebP version to older ones. It’s the ultimate “set and forget” Image Optimization tactic.
8. Mastering Automated CMS Optimization & Conversion
On category pages or shop pages, you might have 20-30 thumbnails loading at once. If these aren’t optimized, the page will crawl.
Tactic: Specific Thumbnail Dimensions
Ensure your WordPress theme or CMS isn’t just “shrinking” the full-sized featured image. Create specific thumbnail sizes in your media settings to ensure these small images have tiny file sizes.
9. Creating an Image Sitemap
Google needs a map to find all your visual assets, especially if you use JavaScript galleries that are hard for bots to crawl.
Tactic: XML Image Sitemaps
Adding images to your XML sitemap increases the likelihood that your images will appear in search results. This is an advanced Image Optimization step that many people overlook.
10. Leveraging Browser Caching to Reduce Latency
Once a user downloads your logo or a common background image, they shouldn’t have to download it again on every single page they visit.
Tactic: Set Long Cache Expirations
By setting an “Expires” header in your .htaccess file, you can tell the browser to keep these images in its local cache for up to a year. This makes subsequent page loads feel instantaneous.
Troubleshooting Common Performance Bottlenecks
Even with the best Image Optimization tactics, you might run into issues.
- Check for CLS (Cumulative Layout Shift): Always define width and height attributes in your HTML. This prevents the page from “jumping” when an image loads.
- Audit with GTmetrix: Use performance tools to see exactly which images are slowing you down.
- Remove EXIF Data: Photos contain “metadata” (camera type, GPS coordinates) that adds unnecessary weight. Strip this data during compression.
The Future of Image Optimization: AI and Beyond
As we look further into 2026, AI is becoming a massive part of the workflow.
AI can now auto-generate alt text, intelligently crop images to focus on the subject, and even “upscale” low-res images using neural networks. Staying ahead of these trends is vital for maintaining your rankings.
The 100/100 Image Performance Checklist
- [ ] Format: Are you using AVIF (Performance) or WebP (Safety) instead of JPEG?
- [ ] Dimensions: Is the physical width matched to your site’s container (e.g., 1200px max)?
- [ ] Compression: Is every image under 100KB (or 30KB for icons)?
- [ ] Naming: Does the filename include your primary keyword with hyphens?
- [ ] Alt Text: Is there a descriptive, non-spammy alt tag for every asset?
- [ ] Lazy Load: Is loading=”lazy” enabled for everything except the Hero image?
- [ ] Attributes: Have you defined width and height in the code to prevent CLS?
Take Control of Your Visual Speed
Image Optimization is not a one-time task; it is a vital part of your publishing workflow that respects your visitors’ time and data.
By choosing the right formats, compressing aggressively, and utilizing modern delivery methods like CDNs, you are setting your website up for long-term success and applying these 10 tactics to see your rankings climb.
Ready to transform your site’s speed? At Keithel Digital, we specialize in deep-level performance audits that turn sluggish WordPress sites into high-performance machines. If you are tired of losing rankings to faster competitors, reach out to us today. Let’s build something fast together.
Does Image Optimization affect the quality of my photos?
With modern lossy compression and WebP formats, the quality loss is usually invisible to the human eye. You can achieve significant file size reductions while keeping your visuals looking crisp and professional.
Is there a free tool for Image Optimization?
Yes. Tools like Squoosh.app (by Google) allow you to manually compress and convert images for free. For WordPress users, plugins like OnePress Image Elevator or EWWW Image Optimizer offer free tiers.
Why is Google PageSpeed Insights still complaining about my images?
This is often due to “Properly Size Images” or “Next-Gen Formats.” Even if compressed, an image might be physically too wide for its container, or you might still be using JPEGs instead of WebP.
Should I use a plugin for Image Optimization or do it manually?
For small sites, manual optimization via Squoosh is fine. However, for blogs with hundreds of images, an automated plugin is essential to ensure consistency and save time.
How does Image Optimization improve my mobile rankings?
Mobile devices often have slower processors and limited data plans. By reducing image weight, your site loads faster on 4G/5G networks, which Google rewards with higher mobile search rankings.